I have a 2019 Tesla M3 and I love the built in features to capture Dashcam and Sentry Mode footage for review later. The Sentry Mode feature captures 10 minutes of video when someone or something approaches your parked vehicle. Dashcam captures video when you're driving. It continuously stores the most recent hour of video and will also save the most recent 10 minutes of video when you press the Dashcam button or when you honk your horn. Where do those videos get saved? As it turns out, they get saved to a flash drive, if you have one plugged into one of the USB ports in the front console.
When you get home, you have to pull the flash drive out of the car and copy the video files to your computer to watch them or store them long term. It’s a fairly low-tech way to manage your data. If you don’t free up space on the flash drive, Sentry Mode will eventually fill up the storage device and your Dashcam feature will stop saving video. What if there was an easy way to save all your Sentry Mode and Dashcam videos automatically when you pull into your garage, and ensure you always have space for new videos? As it turns out, this is a solved problem* if you just want to copy the videos to a computer on your home network. We’ve taken this open source project maintained by GitHub user marcone and created by Reddit user drfrank, and connected it to store the videos on Storj DCS, a decentralized cloud storage service that is secure, private, and extremely affordable.
TL;DR
You can automatically transfer Sentry Mode and Dashcam video clips over WiFi to cloud storage and make room for more videos the next day. We used a Raspberry Pi (a small, low cost, low power computer about the size of an Altoids tin) plugged into the USB port in the dashboard to store the video files. When the Tesla pulls into the garage at night, the Raspberry Pi connects via WiFi and uploads all the videos to Storj DCS cloud storage, then clears off the drive for use the next day. This will also work for videos recorded in Track Mode if you have one of the performance models, making it easy to share any of the videos with your friends.
So, how hard is it?
Ok, so most Tesla owners tend to be pretty technical, so, if that describes you, this is a piece of cake, sorry, Pi. Here’s what you’ll need:
- Raspberry Pi Zero W : ID 3400 : $10.00 - we used a different model, but this is better.
- Adafruit Raspberry Pi Zero Case : ID 3252 : $4.75 - it should look good - you can 3d print your own for extra credit.
- Y Video microSDXC Card $37 - it’s very important to have high quality storage with high write endurance. This gives you room for a few days in case you don’t connect to WiFi and won't wear out too quickly.
- USB A to Micro-B - 3 foot long - A USB Cable to plug into the car.
- Storj DCS cloud storage - Storj provides 25 GB for free and it’s only $0.004 per GB after that! Secure, private, and decentralized.
- Optional Items for easier setup - A Mini HDMI to HDMI Cable - 5 feet : ID 2775 : $5.95 will make it easier to set everything up by connecting the Pi to a monitor.
All in, you’re looking at right around $60 to get going. I’ll wait while you get everything ordered...
Okay, what’s next?
Assuming you have everything you need, we’ve published the detailed, step-by-step instructions in this tutorial. In general, there are four main steps which we share in a brief overview below:
- Create your Storj DCS account
- Set up your Raspberry Pi
- Enable Sentry Mode and Dashcam Mode
- Drive around and honk your horn
After that, you can just go home and park your car. Your Raspberry Pi will connect to your home WiFi and do the rest. You’ll be able to view and share your videos from Storj DCS.
Create your Storj DCS account
Storj DCS is a decentralized cloud object storage service. Storj DCS is like the Airbnb for hard drives—thousands of people with extra hard drive space share that space with Storj, then Storj makes that space available to use for storing things like Tesla videos. Every file stored on Storj DCS is encrypted, encoded for redundancy, and divided into at least 80 pieces— each stored on a different hard drive all over the world, provided by people who share storage space and bandwidth in exchange for STORJ tokens. Of those 80 pieces, you only need any 29 to download your file. That’s a bit of an oversimplification, and it’s even better than it sounds, but you get the idea; cloud storage for your videos. We just released some new features and pretty amazing pricing on April 20 and now you can try it.
First, go to Storj.io and create an account. You get 25 GB of storage and bandwidth a month for free with your new account. After that, you’ll need to create an Access Grant and generate the S3-compatible gateway credentials for use in the application that uploads your data to Storj DCS. Follow the steps in the tutorial and save your gateway credentials for the next step.
Set up your Raspberry Pi
A Raspberry Pi is a mini computer. Setting one up is relatively straightforward. Once you assemble the parts, you can connect to it remotely or plug it in to a monitor keyboard and mouse. To get it up and running, you download an OS like Raspian, flash it to the SD card and boot it up. From there, it’s a matter of installing a few components, including Rclone, which is the application that will upload your videos to Storj DCS. Configure Rclone with the gateway credentials you created on your Storj DCS account. Once you have the Raspberry Pi working, shut it down, unplug everything and head out to your Tesla with the Raspberry Pi and the USB cable.
Enable Sentry Mode and Dashcam Mode
Once you’re in your car, plug the Raspberry Pi into one of the USB ports in the front console. (The ones in the back don’t work for this project.) The Raspberry Pi will store video files through and is also powered by the USB port, so it needs to stay plugged in. Now, you’ll need to enable Sentry Mode and Dashcam Mode. These features are not enabled by default. Follow the steps in the tutorial to enable those two features on your Tesla. Once the Raspberry Pi is plugged in and the features are enabled, you’re ready to see it in action.
Drive around and honk your horn
The easiest way to capture some video clips is to drive around and honk your horn. Of course, if you worked on this until late into the night, your neighbors may or may not be as excited to test it as you are, so honk responsibly. As an alternative, drive around and click the Dashcam button to save a clip. Really, it’s up to you, but just get some video footage. All of the videos generated by Sentry Mode and Dashcam Mode will be saved to the SD card in the Raspberry Pi.
Once you’ve got some video, it’s time for the real magic—go home. When you pull into your garage and your Raspberry Pi connects to your home WiFi, it will upload the trip’s videos to Storj DCS.
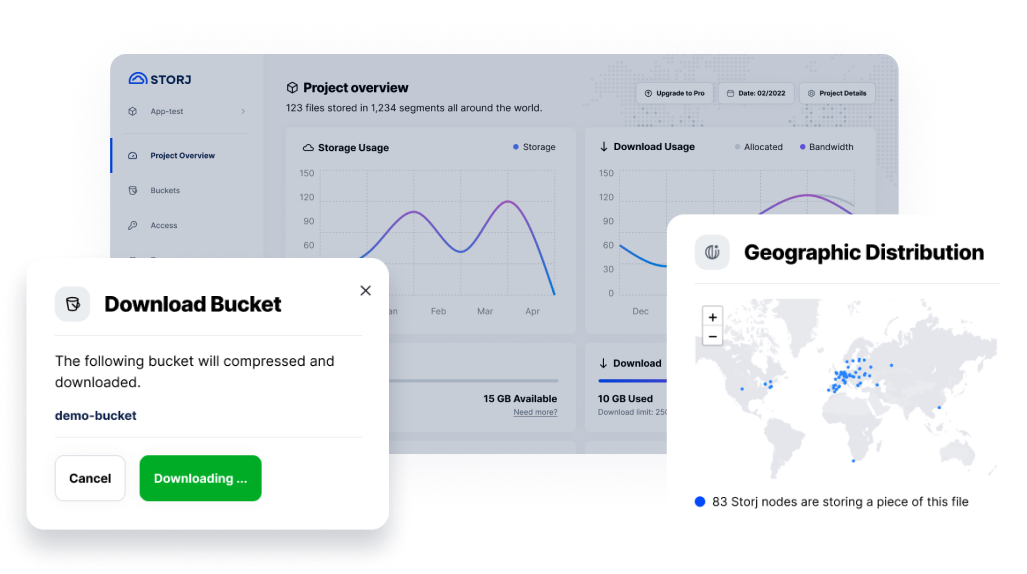
As you drive around, honk your horn, capture Dashcam videos and accumulate Sentry Mode video. Upon return, the videos will be uploaded to your Storj DCS account. Every one of those videos will be encrypted, erasure coded and stored in pieces distributed across our network of 13,000 Storage Nodes (and growing). You can view, download or share those videos with your friends. We’ve shared a sample video from a Tesla belonging to a Storj team member. When you share a file though Storj DCS, the link lets you see all the Storage Nodes storing pieces of your file and stream the file directly from the network. The tutorial also has the steps to share a file (hint: click the share button to create a secure and private link to share).
That’s all there is to it
If you’ve followed along and followed the steps in your tutorial, your Tesla will store your Sentry and Dashcam videos in the decentralized cloud for as long as you want or need them.
Overall this was a really fun project to put together, and shows off yet another way that you can integrate with Storj DCS easily and quickly!
* The code used in this tutorial is open source and uses, among other things, RClone which includes native support for Storj DCS. The GitHub Repository for the code is available at: https://github.com/marcone/teslausb and the project was originally described on the /r/teslamotors subreddit.