Distributed is better for cloud backup storage.
Storj sets the standard in distributed cloud storage with unmatched differentiation.
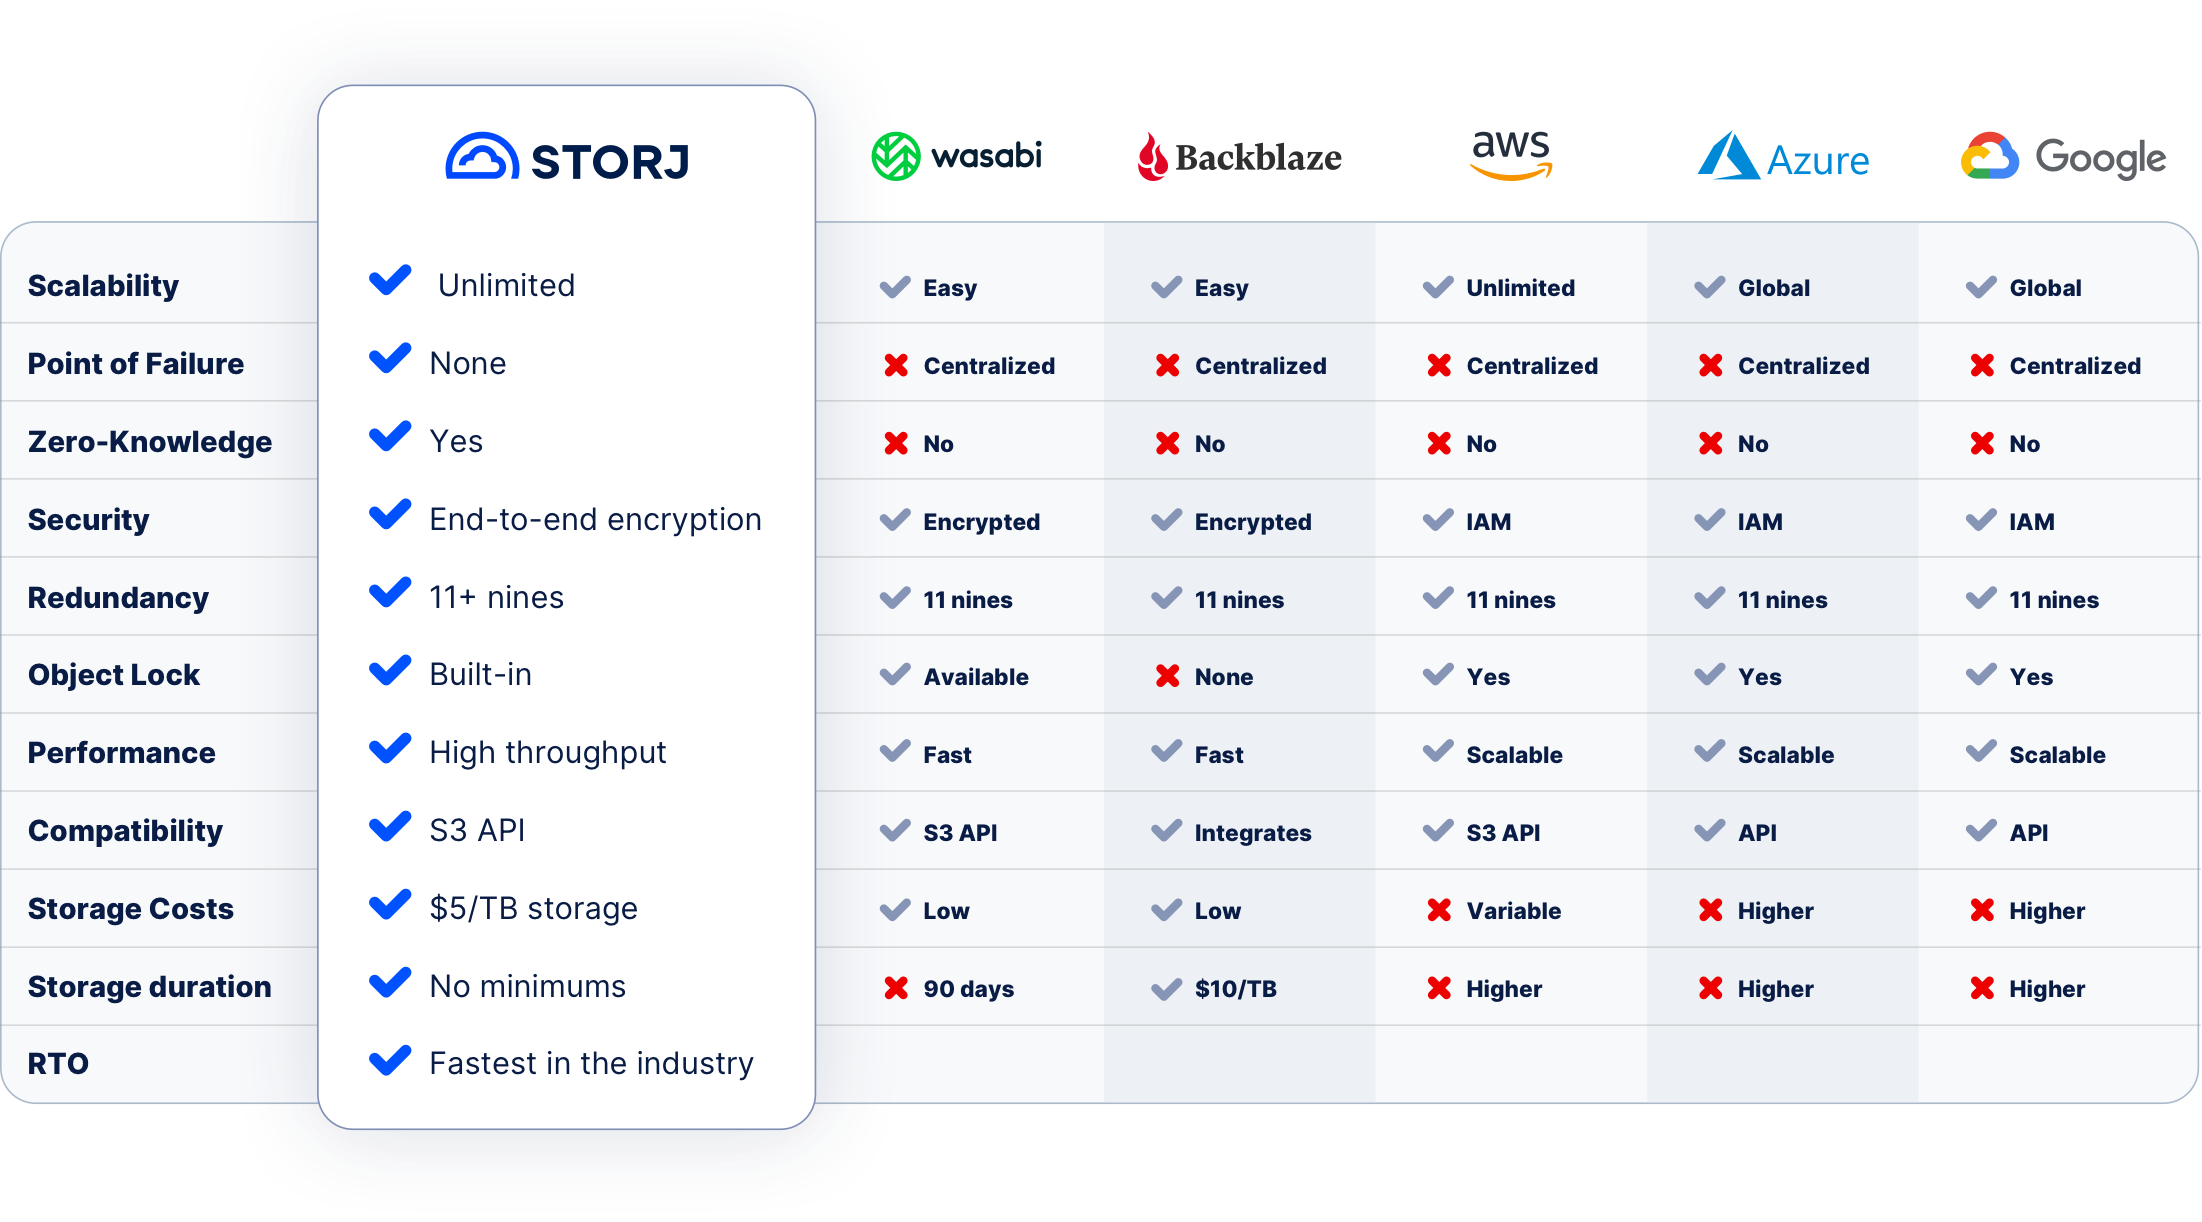


Cloud backup storage, particularly with Storj Object Storage, involves securely storing copies of your important files and data across remote data centers via the internet. These backups ensure your data remains accessible and protected, even in the event of a disaster such as natural disasters, hardware failures, power outages, or cyberattacks. Unlike relying solely on physical hard drives or on-site servers, Storj's cloud backup storage provides a scalable, distributed, and cost-efficient solution designed for modern data needs.
Storj offers a number of advantages, including:
Object storage backup with Storj organizes data into individual objects, combining the data, metadata, and unique identifiers for ease of access and scalability. Unlike traditional hierarchical storage systems, object storage provides unlimited storage, faster retrieval times, and increased flexibility, making it a superior choice for businesses needing to manage several TB of storage or more.
Storj Object Storage prioritizes reliable disaster recovery by distributing encrypted copies of your data across a decentralized network, ensuring it remains accessible despite events like natural disasters, power outages, cyberattacks, or server malfunctions. Quick recovery minimizes downtime and upholds business continuity, safeguarding your operations, reputation, and revenue. You can also add Object Mount to your disaster recovery plans to further reduce your recovery time.
Learn more about Object Mount
Storj employs end-to-end encryption as a default, ensuring data confidentiality during transfer and storage. Decentralization enhances security, as data is divided, encrypted, and distributed globally. Features such as multi-factor authentication, role-based access, and the absence of centralized vulnerabilities help shield your backups from cyberattacks or unauthorized access.
Learn more about end-to-end encryption
Yes, Storj supports Object Lock, providing businesses with an extra layer of protection against accidental deletion or ransomware threats. Object Lock ensures data is immutable for a specified retention period, meeting strict compliance and regulatory requirements. This feature is a critical asset for organizations focused on preserving data integrity and enhancing their data security strategies.
Learn more about Object Lock
Absolutely! Storj is officially Veeam Ready, which means it has been validated by Veeam for seamless integration with their backup and recovery solutions. This certification indicates that Storj can deliver reliable, secure, and highly efficient storage for Veeam-based data backup strategies, enabling businesses to benefit from robust protection and simplified disaster recovery workflows.
Learn more about Veeam Ready certification
Yes, cloud backups on Storj Select network are SOC 2 Type 2 compliant. Data stored on Storj Select is only distributed to data centers that are SOC 2 compliant. This means that they meet strict standards for security, availability, and confidentiality, which are critical for safeguarding customer data. Businesses can confidently store and back up sensitive data securely while meeting industry regulations and best practices.
Learn more about Storj compliance
Storj is committed to providing secure and compliant cloud storage services for its customers, including those who must comply with GRPR regulations. Storj Object Storage has been designed to ensure that customers’ sensitive data is secure, available, and protected. Specific to object storage backup, Storj encrypts to the standard in GDPR regulation stating: Data storage for backup and other purposes that do not require access to data in the clear.
Learn more about GDPR compliance
Storj’s cloud storage pricing model charges based on monthly usage, allowing you to manage costs effectively. Businesses who have multi-region replication for their backups will see significant savings on Storj as redundancy is achieved without replication. That means no need for doubling or tripling your storage and egress costs. The distributed cloud approach makes comprehensive data backup affordable—even for small businesses.
See Storj pricing
Recovery times depend on file size and your internet connection, but Storj’s distributed network reduces bottlenecks significantly. With advanced compression and retrieval methods, even large-scale restorations are quick and efficient, minimizing interruption to your workflow.
Learn more about Storj performance globally
Storj’s remote backup model utilizes geographically dispersed nodes, replacing traditional single-location storage methods like on-site servers, physical hard drives, or centralized data centers. Storj easily integrates with any on-premise or online backup service to be the primary or remote copy as part of your business continuity plan. The distributed structure of Storj ensures data resilience, even in cases of theft, hardware failures, or natural disasters.
Storj offers a seamless setup experience with detailed guides and user-friendly applications. Its default settings simplify backup creation, while flexible configuration options cater to advanced users, making it accessible for all skill levels.
Explore Storj backup integrations
Storj is S3 compatible and is a quick drop-in replacement for your current cloud storage. Storj is also Veeam Ready and integrates easily with most backup solutions.
Learn more about S3 compatibility
Absolutely. By encrypting data and storing it on the distributed cloud, Storj isolates backups from single points of failure, making it more resistant to ransomware and other threats. Regularly updated copies of your data ensure continuity, even after a cyberattack.
Learn more about Storj immutability
The main consideration is having a stable internet connection to access and restore data efficiently. However, Storj’s distributed network optimizes throughput to ensure smooth backups and fast recovery. For most use cases, the scalability, security, and affordability outweigh this minor dependency.


